Well, today i just finished doing all that i described in the previous posts to all 88 notes. well, 87, as i discovered i'm missing a hammer butt!!
So, i'm ordering some hammers, and the missing butt, and possibly a bass string, if i can't splice it.
The hammer I have chosen to order are Abel hammers, manufactured in Germany. I'll have to make some measurements and send an order form, but i'm putting it off for budgeting purposes.
The sound board is really worrying me, as the lower 1 1/2" are heavily damaged by damp. the original casing was a disappointment. i expected it to be solid wood, such as oak, but it turned out to be sandwiched. i think having a solid wood casing would have some acoustic benefits, in addition to the aesthetic +. this also is a question of budgeting. i have this great idea, but i'm letting it simmer for a bit while i work on the harp.
soon to come.. Pictures pictures, and more pictures.
Saturday, May 16, 2009
Tuesday, April 28, 2009
The action (part1)
This was were i started, the action of the piano. since it was the easiest thing to take out, and in my opinion the most complicated part, i decided to start there....
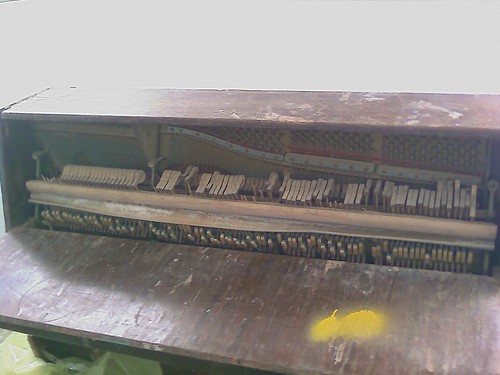
a daunting task.... I saw all the broken shanks and the ugly hammer rail and my optimism started plummeting..
Still i press on.

Lovely.... I then proceeded to take it all apart. trying not to forget to number the notes - something which was eventually useless..
I know have 88 notes, that need fixing up.
Here is what i typically do :
1- cut the bridle strap and free it from the bridle wire

2- free the hammer butt flange

3- cut out the old hammer butt spring and remove the remains of the cord with a pin


5- attach a new hammer butt spring using a toothpick and some glue


6- remove the old bridle strap, cut a new one to size, and glue.


7- now for the flange. remove the old cord using forceps, and glue a new cord


8-sand away the edge of the toothpick after the glue has set


9- use a metal brush to remove the rust from the wippen and other rusted parts


10- put it all together

And there you have it! a not-so-new piano action... but it should work!
a daunting task.... I saw all the broken shanks and the ugly hammer rail and my optimism started plummeting..
Still i press on.
Lovely.... I then proceeded to take it all apart. trying not to forget to number the notes - something which was eventually useless..
I know have 88 notes, that need fixing up.
Here is what i typically do :
1- cut the bridle strap and free it from the bridle wire
2- free the hammer butt flange
3- cut out the old hammer butt spring and remove the remains of the cord with a pin
5- attach a new hammer butt spring using a toothpick and some glue
6- remove the old bridle strap, cut a new one to size, and glue.
7- now for the flange. remove the old cord using forceps, and glue a new cord
8-sand away the edge of the toothpick after the glue has set
9- use a metal brush to remove the rust from the wippen and other rusted parts
10- put it all together
And there you have it! a not-so-new piano action... but it should work!
Introduction
It had all started when I saw the piano in a friend's workshop. It was a wretched thing that was apparently used as a table in the carpenter's warehouse. blotched with paint and with peeling veneer, It didn't look like much. My friend said that he wanted to fix it and never got around to it. It was a steinway upright piano, with an unknown past.
I put it out of my head for months, and then one day I called my friend and asked him if he wants to sell it. I had some free time and I needed a DIY project to keep my mind off things.
He told me that I can have it if I thought it was worth the trouble, not wanting to discuss the price on the phone. He was going to give it to me for a symbolic fee, although someone apparently offered him a handsome amount before. Not wanting to "rip-off" this good friend of mine, I emailed the mother company with the serial number so that i would know for sure the exact age and origin of the piano, and to get a rough estimate of what i should offer him. The reply was that this particular piano was a 1969 steinway model Z, manufactured in Hamburg, with a dull walnut finish. A price of a restored one would be around 3000 Euros, and from what i described it should be around 500 to 1000 Euros.
I had all of this information ready and we set up an appointment to have some coffee and agree on the price. Sadly we never did have that cup of coffee, for the very day we were supposed to meet he passed away.
It was very inappropriate to bring up the subject to his family of course, so I just forgot about the whole thing.
Not a month later his son called and told me I should pick up the piano because his father wanted me to have it. not knowing what to do exactly i just paid a good sum.
So there it was, a dirty, semi decayed piano waiting for my eager hands to rip it apart.

Not having any experience whatsoever, I decided to turn to the guidance and wisdom of the uk piano page forum : http://www.uk-piano.org/piano-forums
Most of the helpful people there were skeptical, and some even advised me to drop it. however I already bought the thing and i couldn't just chuck it out. I told myself what is there to lose? if i keep expenses to a minimum i could have some fun, and learn a thing or two about these mysterious instruments.
so in this blog i will describe the process of rebuilding a piano by a total novice, who has nothing but some DIY skills and an internet connection.
Special thanks to Pianomate, for his constant feedback.
I put it out of my head for months, and then one day I called my friend and asked him if he wants to sell it. I had some free time and I needed a DIY project to keep my mind off things.
He told me that I can have it if I thought it was worth the trouble, not wanting to discuss the price on the phone. He was going to give it to me for a symbolic fee, although someone apparently offered him a handsome amount before. Not wanting to "rip-off" this good friend of mine, I emailed the mother company with the serial number so that i would know for sure the exact age and origin of the piano, and to get a rough estimate of what i should offer him. The reply was that this particular piano was a 1969 steinway model Z, manufactured in Hamburg, with a dull walnut finish. A price of a restored one would be around 3000 Euros, and from what i described it should be around 500 to 1000 Euros.
I had all of this information ready and we set up an appointment to have some coffee and agree on the price. Sadly we never did have that cup of coffee, for the very day we were supposed to meet he passed away.
It was very inappropriate to bring up the subject to his family of course, so I just forgot about the whole thing.
Not a month later his son called and told me I should pick up the piano because his father wanted me to have it. not knowing what to do exactly i just paid a good sum.
So there it was, a dirty, semi decayed piano waiting for my eager hands to rip it apart.
Not having any experience whatsoever, I decided to turn to the guidance and wisdom of the uk piano page forum : http://www.uk-piano.org/piano-forums
Most of the helpful people there were skeptical, and some even advised me to drop it. however I already bought the thing and i couldn't just chuck it out. I told myself what is there to lose? if i keep expenses to a minimum i could have some fun, and learn a thing or two about these mysterious instruments.
so in this blog i will describe the process of rebuilding a piano by a total novice, who has nothing but some DIY skills and an internet connection.
Special thanks to Pianomate, for his constant feedback.
Subscribe to:
Posts (Atom)